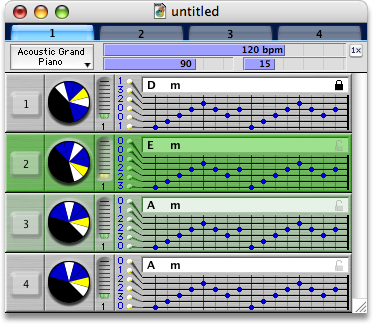
The document window is divided into two sections. The top of the window contains a heading with Part Tabs, a Tempo Slider, and the current part's Velocity and Sustain settings. Below this is your chord progression, displayed as a series of boxes, each with its own Sequencer for making picking patterns.
When you select a line or part in the document the selected chord becomes the Current Chord and the various palettes update to show the properties of the chord. All actions you perform in the palettes then affect the selected chord.
Document HeadingTOP
- Part Tabs
-
The part tabs allow you to select which part you wish to view and edit. Each part has its own instrument, velocity, sustain settings, and chords.
Whenever you perform an operation on the Current Chord only the chord in the active part is directly affected. However the other three parts will be synchronized when they are (1) identical to the visible chord and (2) have no picking pattern. Only the bracket position is unaffected by this auto-synchronization.
- Click on an inactive Part Tab to activate it.
- You can also use the ← and → keys.
- Instrument Menu
-
Use this popup menu to select a General MIDI instrument for the current part.
- You can also use the submenu.
- You can also use the Instrument Popups in the Channels Palette.
- ⌘ click to toggle Instrument Name and Instrument Number.
- This control also responds to a mouse scroll-wheel.
- Tempo Slider
-
This slider indicates the tempo for the entire document and all parts. The tempo is represented in beats-per-minute (BPM). Each vertical line in the sequencer represents 1/4 beat. The tempo can be set to any value from 30 to 300 BPM, so FretPet can theoretically play as many as 28,800 tones per minute (300 BPM x 4 sub-beats x 6 strings x 4 parts). During play changes to the tempo may not take effect right away. To maximize synchronization the player always waits until the beginning of the next chord before using the updated tempo.
- Click and drag to set any value from 30 to 150 BPM.
- Quick-click to set the value to a multiple of 5.
- This control also responds to a mouse scroll-wheel.
- Tempo Doubler
-
The document can be played at normal or double speed. At 1X speed you can adjust the tempo to values between 30 and 150 BPM in intervals of 1/2 BPM. At 2X speed the tempo can be adjusted to any value between 60 and 300 BPM in intervals of 1 BPM. During play changes to the tempo doubler may not take effect right away. To maximize synchronization the player always waits until the beginning of the next chord before using the updated tempo.
- Click to toggle between 1X and 2X speed.
- Velocity Slider
-
Velocity determines how hard notes in this part will be struck, so it's basically equivalent to volume.
- Click and drag to set the velocity from 0 to 127.
- Quick-click to set the value to a multiple of 10.
- This control also responds to a mouse scroll-wheel.
- Sustain Slider
-
Sustain determines how long a note continues to ring after it has been struck.
- Click and drag to set any value from 1 to 50.
- Quick-click constrains the value to a multiple of 5.
- This control also responds to a mouse scroll-wheel.
| When using more complex synthesizers like GarageBand, Absynth, and others, the velocity setting may have a characteristic effect on the timbre of the sound. When the sustain is longer than the interval between successive tones they may merge, slide, or continue in the same envelope. Experiment! |
Chord FeaturesTOP
Every line in the document contains four chords, one for each part. The four chords that live on a single line are referred to as a Chord Group.
- Current Chord
- The green highlighted chord is the Current Chord. All chord operations affect this chord.
- Chord Number
- Each chord is numbered according to its position in the document.
- Chord Circle
-
Every chord is represented by a small version of the Circle. The Chord Circle - unlike the Circle Palette - always has C at 12-o-clock.
- Click inside the Chord Circle to add or remove notes from the Current Chord.
- Chord Name
-
This is the name of the chord. To change a chord's name select one from the Chord Palette or use the Scale Palette to select a new root tone.
- Chord Lock Indicator
-
When the chord root is locked a padlock appears at the right end of the chord name box. Chords with a locked root can be modified as freely as other chords. However the root cannot be changed in the Scale Palette.
- Click the padlock to toggle Root Lock.
- Tablature Numbers
- This is the fingering of the chord represented as fret numbers in the current tuning. For example, 0 1 0 2 3 3 represents a C chord in standard tuning.
- The Repeat Slider
- indicates how many times a chord will repeat when the document is played.
- The Picking Sequencer
- Described Below...
Document How-ToTOP
- Navigating
-
Navigate the Document Window using the mouse or keyboard in much the same manner as you would any typical Mac document.
- Click on a chord to select it.
- Drag to select several chords at once.
- ↑ and ↓ move the document cursor.
- ← and → change the active part.
- ⇧↑ and ⇧↓ move the cursor while extending the selection.
- Page Up / Page Down change the view by a page.
- Home / End move to the top / bottom of the document.
- Adding Chords
-
When you add a chord to the document you are effectively making a copy of the Current Chord. The new chord is placed after the Current Chord and it becomes the new Current Chord.
- Click the Add Chord button in the toolbar to copy the Current Chord.
- You can also press the A key
- Selecting Chords
-
Fretpet allows you to select a range of chords using the traditional methods. You can click and drag in the document, ⇧ click, or use ⇧↑ and ⇧↓. Selected chords appear in a light green color while the Current Chord remains a darker green. This is to remind you that the various palettes reflect the state of the Current Chord and not the whole selection.
FretPet has a menu that you can use to operate on several chords at once. These operations are described in detail in the Filters chapter.
- Deleting Chords
-
When you press the ⌫ key all selected chords are removed from the document. (You can get them back with the Undo command.)
- Press ⌫ or ⌦ to delete the current selection.
- Clear Commands
-
The Clear Button and corresponding menu items only affect the Current Chord regardless of the current selection.
- Click the Clear Button or use the command to remove all tones from the chord.
- ⌥ click the Clear Button or use the command to clear the picking pattern.
- ⇧ click the Clear Button or use the command to remove all tones and clear the picking pattern.
- Edit Commands
-
The standard clipboard commands are available to copy and paste chords. There are also a couple of additional commands that make editing your compositions much easier.
- Use the menu commands to perform standard Cut, Copy, and Paste for single or multiple chords.
- The menu command fills the selected chords in the active part with patterns from the clipboard, repeating them if necessary. The patterns pasted will be those of the part that was visible at the time of the or .
- fills the selected range with chords from the clipboard, repeating them if necessary. The chords pasted will be those of the part that was visible at the time of the or .
- sets the selected range to the whole document.

When you do a regular Copy, Cut, or Paste, all the parts are included in the operation. But Paste Pattern and Paste Tones only affect the Active Part which is plainly visible. - Play Commands
-
At any time you can press the Play Button to hear some or all of your composition. Playback will proceed differently depending on whether you have a selection and the current state of the Loop, Follow View, and Edit Mode buttons in the Toolbar.
See the section on the Toolbar to learn more about the Loop, Follow View, and Edit Mode buttons.
- The Play Button plays the currently selected range.
- The Hear Button plays only the Current Chord.
- You can also use the menu commands and .
The Picking SequencerTOP
The Picking Sequencer is a simple tool you can use to build picking patterns for each chord. It is roughly modeled after a guitar tablature diagram. Only the sequencer of the Current Chord is active. If you click in an inactive chord's sequencer area you will instead select the chord.
- String Lines
- The horizontal lines represent the strings of the guitar. Each string represents a single tone as indicated on the fretboard. If the Fret Bracket is turned off or if no tone is selected on a string then a red x will appear in the tablature area and dots placed on these strings will also appear red.
- Beat Markers
- The vertical lines represent beats in your picking pattern. Each line actually represents a quarter-beat, and the darker lines lines mark whole beats. There are up to 16 quarter-beats available for each pattern.
- Sequence Length
- The thick bar at the right end of the sequencer is used to change the number of beats in the picking pattern for all parts.
Editing ToolsTOP
Clicking and dragging in the sequencer simply adds and removes tones from the picking-pattern. But you can also use the following modifier keys to edit the pattern in other interesting ways:
| MODIFIERS | CLICK ACTION | |
|---|---|---|
| NONE | Toggle single dots | |
| ⌥ | Toggle columns of dots | |
| ⇧ | Move the sequence around | |
| ⇧⌥ | Clone the sequence | |
| ⌘ | Draw a line |